Home Blog Page 2

Hikvision Face Recognition Terminal DS-K1T320MFWX Unboxing

0

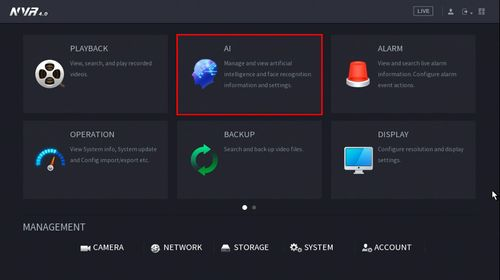
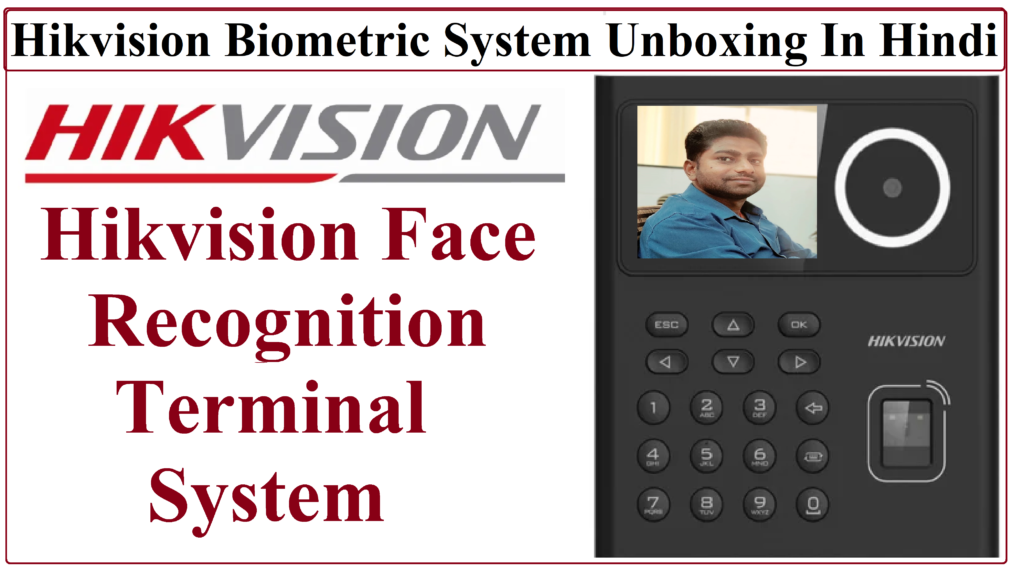
Introduction – Hikvision has developed various products and solutions for security and surveillance, and they have a range of biometric systems, including face recognition technology. Hikvision’s face recognition biometric systems typically involve the use of advanced algorithms to analyze facial features and patterns for identification and authentication purposes. These systems are often integrated into their surveillance cameras or dedicated facial recognition devices.

Key features of Hikvision’s face recognition biometric systems may include:

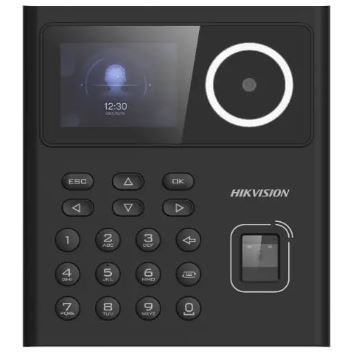
  1. Face Detection and Capture: The ability to detect and capture faces from video streams or images.

  2. Face Database Management: The capability to store and manage a database of registered faces for comparison and identification.

  3. Real-time Identification: Quick and accurate identification of individuals in real-time based on facial characteristics.

  4. Access Control Integration: Integration with access control systems to enhance security by allowing or denying access based on facial recognition.

  5. Event Logging and Reporting: Logging of facial recognition events for monitoring and audit purposes.

  6. Mask Detection: Some systems may include the ability to detect whether a person is wearing a mask, which became particularly relevant during the COVID-19 pandemic.

It’s important to note that the specific features and capabilities of Hikvision’s face recognition systems may vary across different product models and software versions. Additionally, the usage and deployment of facial recognition technology may be subject to legal and ethical considerations, and it’s essential to comply with relevant privacy and data protection regulations.

If you are considering implementing Hikvision’s face recognition biometric system, I recommend checking the latest product offerings and specifications on their official website or contacting Hikvision directly for the most up-to-date and accurate information. Additionally, it’s crucial to be aware of and adhere to any applicable regulations and guidelines related to the use of facial recognition technology in your region.

Please Go with Below Video Unboxing of Hikvision DS-K1T320MFWX Face Recognition Terminal :-

Hikvision Wildlife Camera, Best Camera For Forest

0

Introduction – A Hikvision wildlife camera, also known as a trail camera or game camera, is a specialized camera designed for capturing images or videos of wildlife in their natural habitat. These cameras are commonly used by researchers, wildlife enthusiasts, hunters, and conservationists to monitor and study animal behavior. 

Hikvision is a Chinese company that specializes in video surveillance products and solutions. It is one of the world’s leading providers of security and surveillance technology. The company was founded in 2001 and has grown to become a global leader in the industry.

Here are some key features and considerations for wildlife cameras:

  1. Motion Activation: Wildlife cameras are equipped with motion sensors that trigger the camera to capture images or videos when motion is detected. This helps conserve battery life and memory space by only recording when there is activity.

  2. Infrared or Flash: Many wildlife cameras come with infrared (IR) LEDs or a flash to capture images in low-light or nighttime conditions without disturbing the animals. Infrared is preferred for its discreetness, while flash may startle some animals.

  3. Resolution: Higher resolution cameras capture clearer images and videos. However, higher resolution also means larger file sizes, which may affect storage capacity and battery life.

  4. Battery Life: Consider the type of batteries the camera uses and how long they last. Some cameras use standard AA batteries, while others use rechargeable batteries or solar panels for extended use in the field.

  5. Durability and Weather Resistance: Wildlife cameras are often placed outdoors and need to withstand various weather conditions. Look for cameras that are waterproof and built to withstand harsh environments.

  6. Motion Activation: Wildlife cameras are equipped with motion sensors that trigger the camera to capture images or videos when motion is detected. This helps conserve battery life and memory space by only recording when there is activity.

  7. Infrared or Flash: Many wildlife cameras come with infrared (IR) LEDs or a flash to capture images in low-light or nighttime conditions without disturbing the animals. Infrared is preferred for its discreetness, while flash may startle some animals.

  8. Resolution: Higher resolution cameras capture clearer images and videos. However, higher resolution also means larger file sizes, which may affect storage capacity and battery life.

  9. Battery Life: Consider the type of batteries the camera uses and how long they last. Some cameras use standard AA batteries, while others use rechargeable batteries or solar panels for extended use in the field.

  10. Durability and Weather Resistance: Wildlife cameras are often placed outdoors and need to withstand various weather conditions. Look for cameras that are waterproof and built to withstand harsh environments.

Hikvision Wildlife Camera Installation & Feature, Watch Below Video :-

How to Add Dahua XVR on Dahua NVR

11

Introduction – Connecting a DVR (Digital Video Recorder) to an NVR (Network Video Recorder) can be done through various methods depending on the specific devices you have.

Here’s a general guide on how you might connect a DVR to an NVR:

  1. Connect the XVR to the NVR:

    • Ensure that both the XVR and NVR are connected to the same network.
    • Use a network cable to connect the LAN port on the XVR to an available LAN port on the NVR.
  2. Configure Network Settings:

    • On the Dahua XVR, go to the network settings and assign a unique IP address to it. Make sure the IP address is within the same subnet as the NVR.
    • Note down the IP address, subnet mask, gateway, and DNS settings of the XVR.
  3. Access NVR Web Interface:

    • Open a web browser and enter the IP address of the Dahua NVR into the address bar. This will take you to the NVR’s web interface.
  4. Login to NVR:

    • Log in to the NVR using your username and password.
  5. Add XVR to NVR:

    • Navigate to the settings or configuration section of the NVR.
    • Look for the option to add IP devices or cameras. The exact wording may vary depending on the NVR model.
    • Add a new device, and specify the IP address, port, and login credentials for the Dahua XVR.
  6. Save and Test:

    • Save the settings and restart the NVR if required.
    • Check the status of the XVR in the NVR interface to ensure that it is connected successfully.
  7. View XVR Cameras:

    • Once the XVR is added to the NVR, you should be able to view the cameras connected to the XVR through the NVR interface.
  8. Adjust Settings:

    • You may need to adjust settings such as channel mapping and recording configurations based on your preferences.

For Full Process How to Add Dahua XVR On Dahua NVR, Please Watch Below Video :-

Hikvision Economic Tripod Turnstile

0

Introduction – Hikvision’s Turnstile categories include tripod and full-height turnstiles. All products are developed and manufactured in Hikvision’s own manufacturing center, and each one undergoes a number of tests at the Hikvision Test Center. Every step in the manufacturing process – from raw material processing to assembling and furnishing – is in our hands.

Advantages of Tripod Turnstiles:

  1. Security:

    • Tripod turnstiles are designed to control access to a specific area, enhancing security by allowing only authorized individuals to pass through.
    • They help prevent unauthorized entry and tailgating, as only one person can pass through with each valid authorization.
  2. Space Efficiency:

    • Tripod turnstiles are compact and can be suitable for areas with limited space, making them a practical choice for various environments.
  3. Integration with Access Control Systems:

    • These turnstiles can be integrated with access control systems, RFID card readers, biometric devices, or other authentication methods, providing a seamless and controlled access experience.
  4. Cost-Effectiveness:

    • Economic models like the Hikvision Economic Tripod Turnstile may offer a cost-effective solution for organizations with budget constraints.
  5. Ease of Use:

    • Tripod turnstiles are user-friendly and easy to operate, making them suitable for a wide range of users.

Installation Process (General Steps):

  1. Site Assessment:

    • Conduct a thorough assessment of the site to determine the best location for the turnstile, considering factors like traffic flow, accessibility, and security requirements.
  2. Power Supply:

    • Ensure a stable and reliable power supply is available at the installation site. Some turnstiles may require both electrical and data connections.
  3. Foundation and Mounting:

    • Prepare a stable foundation for the turnstile, ensuring it is level and secure.
    • Mount the turnstile according to the manufacturer’s guidelines, ensuring proper alignment.
  4. Wiring:

    • Connect the turnstile to the power source and any necessary control systems.
    • Follow the manufacturer’s wiring diagrams for proper installation.
  5. Configuration and Calibration:

    • Configure the turnstile settings, such as access modes, direction control, and any integration with access control systems.
    • Calibrate the turnstile to ensure accurate and reliable operation.
  6. Testing:

    • Conduct thorough testing to ensure the turnstile functions correctly.
    • Test various access methods, such as card readers or biometric devices.
  7. Training:

    • Train personnel who will be responsible for operating and maintaining the turnstile.
  8. Documentation:

    • Keep detailed documentation of the installation, including wiring diagrams, configuration settings, and any troubleshooting procedures.

Please Watch the Video of the Installation & accuracy of Hikvision Turnstile

Dahua NVR IVS Missing Object Alarm Setup

0

Introduction – The Intelligent Video Surveillance (IVS) features on Dahua NVRs include functions such as Missing Object Alarm.

To set up a Missing Object Alarm on a Dahua NVR, you can follow these general steps:

  1. Access the Web Interface:

    • Open a web browser and enter the IP address of your Dahua NVR.
  2. Login to the NVR:

    • Enter your NVR’s username and password to log in.
  3. Navigate to the Configuration Page:

    • Look for a tab or section labeled “Configuration,” “Settings,” or similar.
  4. Find the IVS (Intelligent Video Surveillance) Settings:

    • Within the configuration settings, find the section related to Intelligent Video Surveillance (IVS) or Smart Event.
  5. Select Missing Object Alarm:

    • Look for the specific setting related to Missing Object Alarm. This might be labeled as “Object Abandoned,” “Object Removed,” or similar, depending on your NVR model.
  6. Enable Missing Object Alarm:

    • Enable the Missing Object Alarm function.
  7. Configure Parameters:

    • Set up the parameters for the Missing Object Alarm. This may include specifying the region to monitor and adjusting sensitivity settings.
  8. Save and Apply Changes:

    • After configuring the Missing Object Alarm settings, save and apply the changes.
  9. Test the Missing Object Alarm:

    • Conduct a test by placing an object in the monitored area and verify that the Missing Object Alarm triggers appropriately.
  10. Additional Considerations:

    • Check the user manual or documentation specific to your Dahua NVR model for detailed instructions and any additional settings.
    • If you have firmware or software updates available for your NVR, consider updating to the latest version to ensure you have access to the latest features and improvements.

Remember that the exact menu names and options can vary based on the model and firmware version of your Dahua NVR. If you encounter difficulties or if specific menu items are not available, refer to the documentation that came with your NVR or contact Dahua customer support for assistance.

How to Enable Dahua NVR IVS Missing Object Alarm Setup Video Watch in Hindi Language -

How to Enable IP Camera Tripwire Setting

0

Introduction – It will trigger alarm when the target passes through the warning line according to the set movement direction. It takes some time from the target appears to the target is confirmed, so it needs to leave some space when setting warning line, do not set it near the covering.

Here’s a general guide on how to enable the tripwire setting on a Dahua NVR:

  1. Connect to the Dahua NVR:

    • Ensure that your Dahua NVR is connected to your network.
    • Find the IP address of the NVR. This information is often available in the NVR’s settings or can be obtained through a network scanning tool.
  2. Access the Web Interface:

    • Open a web browser and enter the IP address of the Dahua NVR into the address bar.
  3. Login to the NVR:

    • You will be prompted to log in. Use the NVR’s username and password.
  4. Navigate to the Configuration Page:

    • Look for a tab or section labeled “Configuration” or “Settings.” The exact wording may vary depending on the NVR model.
  5. Find the Tripwire Setting:

    • Within the configuration settings, look for a section related to “Video Analytics,” “Smart Event,” or similar. The tripwire setting is often found within this section.
  6. Enable Tripwire:

    • Locate the specific setting for tripwire or line crossing. It may be named “Tripwire,” “Line Crossing,” “Intrusion Detection,” or something similar.
    • Enable the tripwire function.
  7. Configure Tripwire Parameters:

    • Define the tripwire area by setting the start and end points for the line or area you want to monitor.
    • Adjust sensitivity and other parameters as needed. Dahua NVRs usually provide options to fine-tune the detection settings.
  8. Save and Apply Changes:

    • After configuring the tripwire settings, save and apply the changes. Look for a “Save” or “Apply” button within the NVR’s web interface.
  9. Test the Tripwire:

    • After saving the changes, perform a test by walking through the monitored area. Observe how the NVR responds to the tripwire event.
  10. Additional Considerations:

    • Check the Dahua NVR user manual or documentation for specific details related to your model.
    • If you encounter any difficulties, Dahua provides customer support, and you may contact them for assistance.

Keep in mind that the steps provided are general guidelines, and the actual menu names and options may vary based on the specific model and firmware version of your Dahua NVR. Refer to the user manual or documentation that came with your NVR for model-specific instructions.

How to Enable Tripwire Setting on Dahua NVR, Please Watch Below in Hindi Language

Dahua NVR and DVR Motion Recording Setup In Hindi

0

Introduction – Setting up motion recording on Dahua NVR (Network Video Recorder) and DVR (Digital Video Recorder) involves configuring the system to record video footage only when motion is detected.

Below are general steps that you can follow. Please note that the specific steps may vary depending on the model and firmware version of your device.

Motion Recording Setup on Dahua NVR/DVR:

  1. Access the Device:

    • Connect your computer to the same network as your Dahua NVR/DVR.
    • Open a web browser (Google Chrome, Mozilla Firefox, or Internet Explorer) and enter the IP address of your device in the address bar. The default login credentials are typically:
      • Username: admin
      • Password: admin
  2. Navigate to Motion Detection Settings:

    • Once logged in, find the “Setup” or “Configuration” menu.
    • Look for the “Event” or “Alarm” settings.
  3. Enable Motion Detection:

    • In the Event or Alarm settings, locate the Motion Detection option.
    • Enable or turn on the Motion Detection feature.
  4. Configure Motion Detection Parameters:

    • Adjust the sensitivity level: This determines how sensitive the system is to motion. You may need to fine-tune this based on your environment.
    • Set up detection areas: Define specific regions within the camera’s view where motion detection should be active.
  5. Schedule Motion Recording:

    • Some systems allow you to set schedules for when motion recording is active. Configure the days and time periods when you want motion recording to be active.
  6. Configure Recording Settings:

    • In the same menu, find the Recording settings.
    • Set the recording mode to “Motion Detection.”
  7. Save and Apply:

    • After making the necessary changes, click on “Save” or “Apply” to save the settings.
  8. View Recorded Footage:

    • To view the recorded footage, navigate to the Playback or Search menu.
    • Specify the date and time range you want to review.

Additional Tips:

  • Motion Detection Sensitivity: Adjust the sensitivity level carefully to avoid false alarms caused by environmental factors like moving trees or shadows.

  • Notification Alerts: Some Dahua systems allow you to set up email or push notification alerts when motion is detected. Check the notification settings if you want to receive alerts.

  • Firmware Update: Ensure that your NVR/DVR has the latest firmware installed. Check the Dahua website for firmware updates.

Always refer to the user manual specific to your model for detailed instructions. If you encounter difficulties, Dahua’s customer support or official documentation can provide assistance.

Watch the Full Process of Motion Recording Setup, Please Watch the Below YouTube video In Hindi Language

CP PLUS CP21 EEZO 1080P Wi Fi AI Camera

0

Introduction – CP Plus CP21 EEZO is a series of cameras offered by CP Plus, a company specializing in security and surveillance solutions. The installation process for CP Plus CP21 EEZO cameras involves several steps, including mounting the camera, connecting it to power and, if applicable, configuring it with a Network Video Recorder (NVR) or a recording device.

Below is a general guide for the installation process:

Installation Steps:

  1. Camera Placement:

    • Choose an optimal location for mounting the CP21 EEZO camera. Ensure a clear view of the area you want to monitor.
  2. Mounting the Camera:

    • Fix the camera securely in place using the provided mounting bracket and screws. Make sure it is positioned at the desired angle.
  3. Power Connection:

    • Connect the camera to a power source using the supplied power adapter. Ensure a stable power supply for continuous operation.
  4. Network Connection (If applicable):

    • If the CP21 EEZO camera is designed to connect to a network, use an Ethernet cable to connect it to a network switch or router.
  5. Wireless Configuration (If applicable):

    • If the camera supports wireless connectivity, follow the manufacturer’s instructions to configure the wireless settings. This may involve connecting to a WiFi network.
  6. NVR Connection (If applicable):

    • If you are using a Network Video Recorder, connect the camera to the NVR using an Ethernet cable. Follow the NVR’s manual for instructions on adding the camera to the system.
  7. Power Up:

    • Power on the CP21 EEZO camera and, if applicable, the NVR. Check for any indicator lights that confirm power.
  8. Camera Setup via Web Interface:

    • Access the camera’s web interface through a web browser. Enter the camera’s IP address in the browser and log in using the default credentials or those you set during the initial setup.
  9. Configure Camera Settings:

    • Set up camera settings, such as resolution, frame rate, motion detection, and any other preferences through the web interface.
  10. Remote Access (Optional):

    • Configure remote access if desired, allowing you to view the camera feed from a computer or mobile device. This may involve setting up port forwarding on your router.
  11. Testing:

    • Perform thorough testing to ensure the camera is capturing video correctly and that it integrates well with any recording or monitoring system.
  12. Documentation:

    • Keep a record of the camera’s IP address, login credentials, and any other relevant information for future reference.

To Watch Full Installation Video In Hindi, Please Watch Below Video

How to Unbind CP Plus EzyKam Camera In Hindi

0

Introduction – CP Plus EzyKam camera from a device or account may vary depending on the model and software version. The steps provided below are general guidelines, and it’s essential to refer to the user manual or documentation that came with your CP Plus EzyKam camera for precise instructions. If there have been updates or changes to the system after my last update, you should check the latest documentation or contact CP Plus support for assistance.

Here is a general guide on how to unbind a CP Plus EzyKam camera:

Using the CP Plus EzyKam Mobile App:

  1. Open the App:

    • Launch the CP Plus EzyKam mobile app on your smartphone or tablet.
  2. Log In:

    • Log in to your account associated with the EzyKam cameras.
  3. Access Camera Settings:

    • Navigate to the settings or camera management section within the app.
  4. Find Unbind or Remove Option:

    • Look for an option that allows you to unbind or remove the camera from your account.
  5. Confirm Unbinding:

    • Follow the on-screen instructions to confirm the unbinding process. This may involve entering a password or confirming your intention to unbind the camera.
  6. Complete Unbinding:

    • Once the unbinding process is complete, the camera should no longer be associated with your account.

Using Web Interface (if applicable):

  1. Access the Web Interface:

    • Open a web browser and enter the IP address or domain associated with your CP Plus EzyKam camera.
  2. Login:

    • Log in to the camera’s web interface using your credentials.
  3. Navigate to Settings:

    • Find the settings or device management section in the web interface.
  4. Locate Unbind Option:

    • Look for an option related to unbinding or removing the camera.
  5. Confirm Unbinding:

    • Follow the on-screen instructions to confirm and complete the unbinding process.

Additional Steps:

  • Reset the Camera (if needed):

    • Some cameras may have a physical reset button. If unbinding doesn’t work, consider resetting the camera to its factory defaults and then setting it up again.
  • Contact CP Plus Support:

    • If you encounter difficulties or if the steps vary for your specific model, it’s advisable to contact CP Plus customer support for assistance.

To Watch Full Installation Process In Hindi, Please Watch the video

CP Plus Wifi NVR KIT With Wireless Camera Configuration In Hindi

0

Introduction– CP Plus is a brand that offers security and surveillance solutions, including NVR (Network Video Recorder) kits. NVR kits typically consist of cameras, a network video recorder, and sometimes other accessories needed for a complete surveillance system.

If you are specifically looking for a CP Plus WiFi NVR Kit, it’s likely a system that uses wireless technology for communication between the cameras and the NVR. This can be advantageous for installations where running cables is challenging or not feasible.

To get detailed and up-to-date information about a specific CP Plus WiFi NVR Kit, you should visit the official CP Plus website or contact their customer support. Product specifications, features, and compatibility can change, and it’s always best to refer to the latest information provided by the manufacturer.

Here are general steps you can take to find the information you need:

  1. Visit the Official Website: Go to the official CP Plus website and navigate to the “Products” or “Surveillance Systems” section. Look for the specific product category related to WiFi NVR kits.

  2. Product Documentation: Check for product documentation, user manuals, or datasheets. These documents often provide detailed information about the features, specifications, and setup instructions.

  3. Customer Support: If you can’t find the information online, reach out to CP Plus customer support. They should be able to provide you with the most accurate and up-to-date details about the WiFi NVR Kit you are interested in.

The installation process for a CP Plus WiFi NVR Kit involves setting up the cameras, connecting them to the NVR, configuring the system settings, and ensuring proper functionality. Keep in mind that the specific steps may vary depending on the model and features of your CP Plus kit, so it’s essential to refer to the user manual provided with your specific product. However, I can provide you with a general overview of the typical installation process:

1. Unboxing and Inventory:

  • Unbox the NVR kit and ensure that all components are included, such as cameras, NVR, power adapters, cables, and any other accessories.

2. Camera Placement:

  • Identify suitable locations for your cameras based on your surveillance needs.
  • Ensure a clear line of sight and proper coverage of the areas you want to monitor.

3. Power Connections:

  • Connect each camera to a power source using the provided power adapters.
  • Ensure a stable power supply for the NVR as well.

4. Camera-NVR Connections:

  • Connect each camera to the NVR using the provided cables. This could involve Ethernet cables or a wireless connection depending on whether it’s a WiFi NVR kit.
  • For wireless connections, follow the manufacturer’s instructions for syncing the cameras with the NVR.

5. Network Setup:

  • If the kit includes a WiFi NVR, configure the network settings to connect the NVR to your local WiFi network.
  • If using wired connections, ensure proper Ethernet connections.

6. Power Up:

  • Power up the cameras and NVR.

7. Configuration:

  • Access the NVR’s interface through a web browser or dedicated software.
  • Follow the on-screen instructions to configure system settings, such as date and time, user accounts, and recording preferences.

8. Camera Configuration:

  • Configure individual camera settings, such as resolution, motion detection, and recording modes.
  • Verify that each camera is properly displaying video on the NVR.

9. Remote Access (Optional):

  • Set up remote access if desired, allowing you to view the camera feeds from a computer or mobile device.

10. Testing:

  • Conduct thorough testing of the system to ensure all cameras are functioning correctly, and the NVR is recording as expected.

11. Troubleshooting:

  • If any issues arise during the installation or testing, refer to the user manual for troubleshooting guidance or contact CP Plus customer support.

To Watch Full Installation Process of CP Plus Wifi Kit, Please Watch Below Video